Deploy a Laravel App Using GitHub Actions
- Published on
- Reading time
- 10 min read
Take a Laravel app live: set up CloudPanel on a VPS, secure it with Cloudflare, and let GitHub Actions test and deploy every push.
Building a CI/CD pipeline for your app is one of the nicest things you can do once development is finished, or when you want a staging server to check your project on. In this guide I walk you through the whole path I use to take a Laravel app live: preparing a fresh VPS with CloudPanel, putting it behind Cloudflare, cloning the repository, and finally wiring up GitHub Actions so every push to master is tested and deployed automatically.
Follow the steps in order and you will end up with an app that deploys itself.
1. Install CloudPanel

To start working on a new server you normally need to install a lot of packages, or use a Docker container. The easy way to start deploying a Laravel PHP app is to get a VPS from any provider, such as AWS EC2 or Hetzner Cloud. Once you have your VPS, it must run Ubuntu 22.04, and then you can follow along.
Note: this guide was written in 2023 for Ubuntu 22.04; check CloudPanel's docs for the currently supported releases.
What is CloudPanel?
CloudPanel is a free and modern server control panel to configure and manage a server with an obsessive focus on simplicity.
It runs PHP, Node.js, static websites, reverse proxies and Python applications in no time on a high-performance technology stack.
It has quick-launch support for:
- Amazon Web Services
- Digital Ocean
- Hetzner Cloud
- Google Compute Engine
- Microsoft Azure
- Oracle Cloud
- Vultr
- Other

Benefits
- Free
- Easy to use
- Community driven
- Blazing fast page loads, up to 250x faster
- Secure (free SSL/TLS certificates)
- Cloudflare integration
- High performance
- Ready to go within 1 minute
- Supports all major clouds
- Support for x86 and ARM
Install it on the server
-
Log in to your server from your terminal over SSH. If you log in with a password, the command is:
ssh root@yourIpAddressIf you log in with a private key, the command is:
ssh -i path_to_your_private_key root@yourIpAddress -
You are now at the server root and the server is empty. Before installing the panel, update the system and add the packages the installer needs:
apt update && apt -y upgrade && apt -y install curl wget sudo -
Now install CloudPanel. The installer script is downloaded, checked against its SHA-256 checksum, and only then executed:
curl -sS https://installer.cloudpanel.io/ce/v2/install.sh -o install.sh; \
echo "3c30168958264ced81ca9b58dbc55b4d28585d9066b9da085f2b130ae91c50f6 install.sh" | \
sha256sum -c && sudo bash install.sh
Access CloudPanel
Security first: access CloudPanel as fast as possible after installing it and create the admin user. There is a small time window in which bots can create that user before you do. If possible, open port 8443 only for your own IP in the firewall.
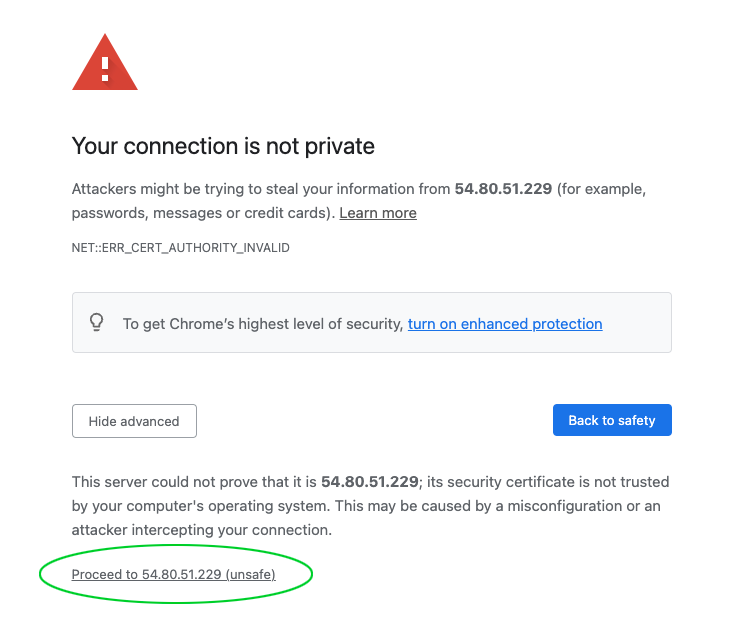
You can now open CloudPanel in your browser at https://yourIpAddress:8443.
Ignore the self-signed certificate warning: click Advanced, then Proceed to continue to CloudPanel.
2. Link Cloudflare

I believe security and caching make any app better, so we secure the server by putting it behind Cloudflare's DNS reverse proxy and using its caching power.
Create a Cloudflare account
Creating a Cloudflare account is as easy as on any other website: go to the sign-up page and create a new account.
Add your domain to Cloudflare

- On the Cloudflare dashboard, open the Websites tab and click the Add a site button on the right.
- Enter your domain. Cloudflare gives you its nameservers.
- Go to your domain provider and replace the nameservers with the Cloudflare ones.
This can take up to 24 hours with some providers. I use Google Domains and it takes just 10 minutes. After that, your domain is active on Cloudflare.
Note: Google Domains has since been discontinued; the nameserver change works the same way with any registrar.
Connect a domain to CloudPanel
- Open your domain in Cloudflare once it is active and go to the DNS tab.
- Add a new
Arecord pointingcp.to your server IP. Make sure the proxy status is DNS only. - In CloudPanel, open Admin Area, then Settings, and change the CloudPanel custom domain to
cp.YOUR_DOMAIN.
CloudPanel generates an SSL certificate automatically and links the domain, so from now on you can reach the panel on your own domain.
Connect the project domain

- In CloudPanel, open the Websites tab, click Add Site, choose Create a PHP Site, fill in the details and click Create. CloudPanel adds an nginx template and PHP-FPM for your domain.
- In Cloudflare, add a new DNS
Arecord for the project domain pointing to your server. - Still in Cloudflare, open the SSL/TLS tab and create a new Origin Server certificate. It gives you a certificate valid for 15 years, for free. Copy it.
- Back in CloudPanel, select your new site, open its SSL/TLS tab, click Actions, then Import Certificate, and paste the Cloudflare certificate.

Your domain is now linked and secured with SSL. Open it in the browser and make sure it works.
3. Clone the repository
Give the server access to GitHub
-
Log in over SSH with the site user that CloudPanel created for the project:
ssh youproject@yourIpAddressOr, with a private key:
ssh -i path_to_your_private_key root@yourIpAddress -
As that user, generate an SSH key to link the server with your GitHub project:
ssh-keygen -t ed25519 -C "[email protected]"You can just press Enter at every prompt. When it finishes it prints the path of the public key, ending in
.pub. -
Print the public key and copy its content:
cat ~/.ssh/id_ed25519.pubHere
~/.ssh/id_ed25519.pubis the default path for an ed25519 key; use the pathssh-keygenprinted if yours differs. -
In your GitHub repo, open Settings, then Deploy keys, click Add deploy key, give it a name, paste the key and save it.
Clone the project
Your server now has access to the repo. Go to the project path, which looks like this:
cd /home/yourproject/htdocs/yourproject.com
and clone the repo into the current directory (note the trailing .):
git clone [email protected]:tomatophp/tomato.git .
Set up the .env file
Copy the example environment file:
cp .env.example .env
Create a new database from the Databases tab in CloudPanel, then add its details to .env:
DB_CONNECTION=mysql
DB_HOST=127.0.0.1
DB_PORT=3306
DB_DATABASE=tomato-kit
DB_USERNAME=root
DB_PASSWORD=your_password
Then change the main URL:
APP_URL=https://yourproject.com
APP_HOST=yourproject.com
Install Composer packages and clean the project
Install the Composer packages:
composer install
Then run your project commands. The important ones are:
php artisan key:generate
php artisan config:cache
php artisan storage:link
php artisan optimize:clear
Install NVM, npm and Yarn
The app is now ready for its frontend assets, and for that you need npm.
-
Install nvm:
curl -o- https://raw.githubusercontent.com/nvm-sh/nvm/v0.39.2/install.sh | bash -
Reload the current shell environment:
source ~/.bashrc -
Install the Node.js version you need, for example 18:
nvm install 18 -
Activate it:
nvm use 18 -
Check the Node.js version:
node -v -
Install Yarn globally:
npm -g i yarn -
Build the assets:
yarn && yarn build
Note: nvm v0.39.2 and Node.js 18 were current in 2023; newer releases work the same way.
Your project is ready, and you can view it in the browser.
4. Create the GitHub Actions workflow
The next step of the CI/CD is a workflow YAML file in the repo. In your project, create a .github folder, a workflows folder inside it, and a ci.yaml file inside that:
mkdir .github
cd .github
mkdir workflows
cd workflows
touch ci.yaml
Add this workflow to ci.yaml:
name: Testing Laravel with MySQL
on:
  pull_request:
    branches:
      - master
  push:
    branches:
      - master

jobs:
  laravel:
    name: Laravel (PHP ${{ matrix.php-versions }})
    runs-on: ubuntu-latest
    env:
      DB_DATABASE: laravel
      DB_USERNAME: root
      DB_PASSWORD: password
      BROADCAST_DRIVER: log
      CACHE_DRIVER: redis
      QUEUE_CONNECTION: redis
      SESSION_DRIVER: redis
    services:
      mysql:
        image: mysql:8.0
        env:
          MYSQL_ALLOW_EMPTY_PASSWORD: false
          MYSQL_ROOT_PASSWORD: password
          MYSQL_DATABASE: laravel
        ports:
          - 3306/tcp
        options: --health-cmd="mysqladmin ping" --health-interval=10s --health-timeout=5s --health-retries=3

      redis:
        image: redis
        ports:
          - 6379/tcp
        options: --health-cmd="redis-cli ping" --health-interval=10s --health-timeout=5s --health-retries=3
    strategy:
      fail-fast: false
      matrix:
        php-versions: ['8.2']
    steps:
      - name: Checkout
        uses: actions/checkout@v4

      - name: Setup PHP
        uses: shivammathur/setup-php@v2
        with:
          php-version: ${{ matrix.php-versions }}
          extensions: sqlite, pdo_sqlite, pcntl, zip, intl, exif, mbstring, dom, fileinfo, mysql
          coverage: xdebug

      - name: Get composer cache directory
        id: composer-cache
        run: echo "dir=$(composer config cache-files-dir)" >> $GITHUB_OUTPUT

      - name: Cache composer dependencies
        uses: actions/cache@v3
        with:
          path: ${{ steps.composer-cache.outputs.dir }}
          # Use composer.json for key, if composer.lock is not committed.
          # key: ${{ runner.os }}-composer-${{ hashFiles('**/composer.json') }}
          key: ${{ runner.os }}-composer-${{ hashFiles('**/composer.lock') }}
          restore-keys: ${{ runner.os }}-composer-


      - name: Install Composer dependencies
        run: composer install --no-progress --prefer-dist --optimize-autoloader

      - name: Prepare Laravel Application
        run: |
          php -r "file_exists('.env') || copy('.env.example', '.env');"
          php artisan key:generate

      - name: Clear Config
        run: php artisan config:clear

      - name: Run Migration
        run: php artisan migrate -v
        env:
          DB_PORT: ${{ job.services.mysql.ports['3306'] }}
          REDIS_PORT: ${{ job.services.redis.ports['6379'] }}

      - name: Test with phpunit
        run: vendor/bin/phpunit --coverage-text
        env:
          DB_PORT: ${{ job.services.mysql.ports['3306'] }}
          REDIS_PORT: ${{ job.services.redis.ports['6379'] }}

      - name: Install Yarn dependencies
        run: yarn

      - name: Compile assets
        run: yarn build

      - name: Deploy to server
        uses: appleboy/ssh-action@master
        with:
          host: ${{ secrets.SSH_HOST }}
          username: ${{ secrets.SSH_USERNAME }}
          port: ${{ secrets.SSH_PORT }}
          password: ${{ secrets.SSH_PASSWORD }}
          script: cd ${{ secrets.SSH_PATH }} && ./.scripts/deploy.sh
What the workflow does
The workflow fires on every push or pull request to the master branch. It spins up MySQL and Redis services, installs PHP and the Composer dependencies, runs the migrations and the PHPUnit tests, and builds the assets. Only when all of that passes does the last step SSH into your server and run the deploy script.
Add the server secrets
The SSH step reads the server details from GitHub secrets. In your GitHub repo, open Settings, then Secrets and variables, then Actions, and add a new secret for each key. For example, SSH_HOST holds your server IP. You need all of these:
SSH_HOST: 8.8.8.8
SSH_USERNAME: yourproject
SSH_PORT: 22
SSH_PASSWORD: yourpassword
SSH_PATH: /home/yourproject/htdocs/yourdomain.com
Then make sure .env.example matches the database the workflow creates, because the workflow copies it to .env:
DB_CONNECTION=mysql
DB_HOST=127.0.0.1
DB_PORT=3306
DB_DATABASE=laravel
DB_USERNAME=root
DB_PASSWORD=password
Note: actions/cache@v3 was current when this was written; GitHub has since released newer major versions.
5. Write the deploy script
The deploy script is what runs on the server every time you push, so it should contain every command you want executed on each deployment.
Create a .scripts folder with a deploy.sh file inside it, and give the file permission 755 so it can run:
mkdir .scripts
cd .scripts
touch deploy.sh
chmod 755 deploy.sh
Add this script to the file and customise it as you like:
#!/bin/bash
set -e

echo "Deployment started ..."

# Enter maintenance mode or return true
# if already is in maintenance mode
(php artisan down) || true

# Pull the latest version of the app
git reset --hard
git pull origin master

# Install composer dependencies
composer install --no-dev --no-interaction --prefer-dist --optimize-autoloader

# Clear the old cache
php artisan clear-compiled

# Recreate cache
php artisan optimize

# Compile npm assets
yarn
yarn build

# Run database migrations
php artisan migrate --force

# Exit maintenance mode
php artisan up

echo "Deployment finished!"
The script puts the app into maintenance mode, pulls the latest code, installs production dependencies, rebuilds the caches and assets, runs the migrations, and brings the app back up. Because of set -e, it stops at the first command that fails.
Wrapping up
Push all of these changes to your GitHub repo. Open the Actions tab and you will see the workflow run; once it finishes, the updates are live on your server.
From now on, every push to master is tested first and deployed only if the tests pass, with CloudPanel managing the server and Cloudflare protecting and caching it.